
You’re here, which means (1) you’re a ClickFunnels 2.0 user and (2) you want to understand how URL redirects in the latest version of everyone’s favorite funnel-building tool work.
ClickFunnels practically invented the concept of sales funnels, and its creator Russel Brunson literally wrote the book on how to build funnels that work. Although it’s still in beta and far from being as feature-rich as the tool’s first version, ClickFunnels 2.0 is also a step up in many ways.
One of those ways are URL redirects. A long awaited feature by many a ClickFunnels 2.0 first adopter, URL redirects let you forward visitors from one URL to another on the domain name of your ClickFunnels site. Instead of having to use third-party tools like before, you can now create and manage redirects directly from within ClickFunnels.
This tutorial will teach you how — and walk you through the URL redirect feature’s many options.
Why Use URL Redirects in ClickFunnels
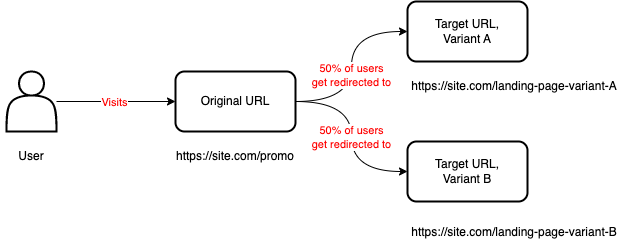
To put it simply, a URL redirect is just a link that leads to another page. You share the link in your ads, on your social media posts, or in your blog content, email campaigns, podcast episodes, YouTube videos — and you control the page users land on when they click on it.
Here’s a diagram to illustrate this:

Why would you want URL redirects?
For starters, you can create short, catchy links for users to look at, click on, and remember, then redirect them to the long, impossible-to-remember URLs of your actual landing pages.
Those long, impossible-to-remember URLs? You or your ad person can add all the UTM parameters and what-nots to them that you like, and yet users will only see them after they’ve clicked on the short, catchy link and landed on the target URL.
Third, you can add links to your content on your own channels — blogs, podcasts, YouTube channels, TikTok profiles, you name it — and then change the pages they lead visitors to over time. That’s a lifesaver if you do content marketing because you don’t need to go back and edit links whenever a page changes. And a lifesaver for those who do a lot of print marketing with links and QR codes.
Last but not least, you can run A/B tests. Like, you can sent 50 percent, or however many you want, of your visitors to one page, and the remaining 50 percent to another so you can test different designs, copy, offers, etc.
Here’s another diagram to help you see what I mean:
Yes, ClickFunnels 2.0 lets you do that. So let’s see how.
How to Create a URL Redirect in ClickFunnels
Follow the steps in the guide below to create your first URL redirect in ClickFunnels 2.0.
Step 1: Fire up your browser, go to myclickfunnels.com, and sign into your ClickFunnels 2.0 account.
Step 2: Open the workspace for your website and switch to the “Site & Funnels” tab from the sidebar to the left.

Step 3: Now click on “URL redirects” on the extension of the left sidebar that showed up.

Step 4: Click on the “New URL redirect” button.

Step 5: Wait for the page that lets you create a new URL redirect to load.
Step 6: Enter a “Name,” “Original path,” and “Target URL” for your URL redirect. These are the only three required fields to create a URL redirect.

“Name” is just a name for your URL redirect to help you remember what it is inside ClickFunnels. Give it a clear, concise, and self-explanatory name; it will only be seen by you and the members of your team in ClickFunnels 2.0.
“Original path” is the original URL, the one that you will share with the rest of the world. Note that it already contains your domain name. So if your domain name is site.com and you want to create the link site.com/valentines-day, enter only “/valentines-day” in the text field.
“Target URL” is the page that users will be redirected to when they click on your link. Unlike the “Original path,” which can only be on your site’s domain name, the “Target URL” can be on any domain name that you want. In other words, you can create URL redirects to any destination on the Internet — on ClickFunnels 2.0 or not.
Step 7: Click on the “Create URL” redirect button in the upper-right corner of the browser window.
What About All the Other Fields?
Don’t worry, your ClickFunnels guy’s got you covered. I’m not going to leave you hanging and wondering about everything else you see on the URL redirects creation page.
Although you can create a URL redirect just by entering a name, original path, and target URL, ClickFunnels 2.0 has several other options that let you take URL redirection — and your funnel game — to a whole new level.
Let’s go over each of them.
Split Testing

“Split testing” lets you create a URL redirect that leads to two links at the same time, and define the percentage of users that are sent (randomly) to each.
Suppose you have two landing pages because you want to test different designs, copy, or offers out. What you do is create the URL redirect as usual, then paste the URL of the second landing page into the “Second URL” field and indicate what percent of the users who click your link should see it.
In the above screenshot, I’ve created two landing pages for a Valentine’s Day campaign with a 50/50 split. This means that every second user who clicks the link will see the second page. You get the drill — this is a really, really powerful feature for ClickFunnels 2.0 site owners who get a lot of traffic and run A/B tests.
UTM Tracking
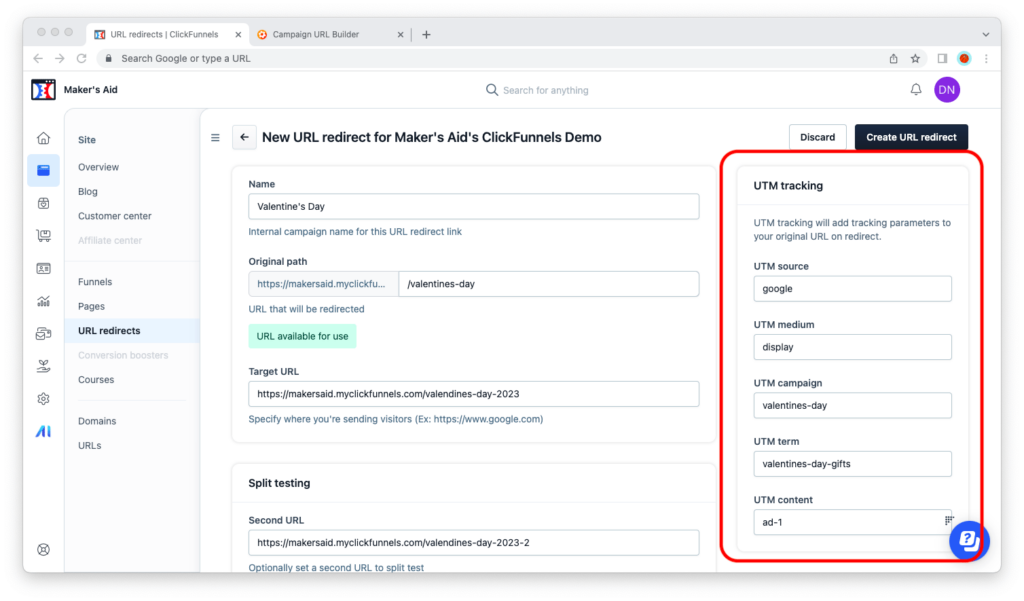
Do you buy ads or send emails to a big list? Then there’s no need for me to tell you about UTM parameters and how they can help you attribute where users who convert come from. (Those of you who don’t most probably don’t need to know about UTM parameters, or use them, yet.)
If the “UTM tracking” section weren’t on this page and you wanted to add UTM parameters to the target URL of your URL redirect, you would have to use the Google Campaign URL Builder to add them to that URL manually before pasting it into the “Target URL” field.
But now that it is, you don’t have to. ClickFunnels 2.0 makes it stupid-easy to add UTM parameters to your links by letting you do this from where you’re creating them. Brilliant.
Retargeting Pixel

Need to retarget the users who’ve clicked on your URL redirect? Add your Meta pixel or Google Ads tag here, and you can collect those users in an audience.
Even if you’re running a split test and sending visitors to two different pages, ClickFunnels 2.0 will still trigger the pixel and help you collect an audience from every user who’s clicked on the original link.