
Okay, so you’re building your website with ClickFunnels 2.0, and you want to know how to add a product so that customers can buy it from the store or from within your sales funnels?
It’s good that you stopped by, because that’s exactly what I’m going to show you in this tutorial if you read on — in plain English, explained step by step, and with screenshots so you can follow along.
Adding a Product in ClickFunnels
Follow the steps in the guide below to add a product to your ClickFunnels 2.0 site.
Step 1: Fire up your browser, go to myclickfunnels.com, and sign into your ClickFunnels 2.0 account.
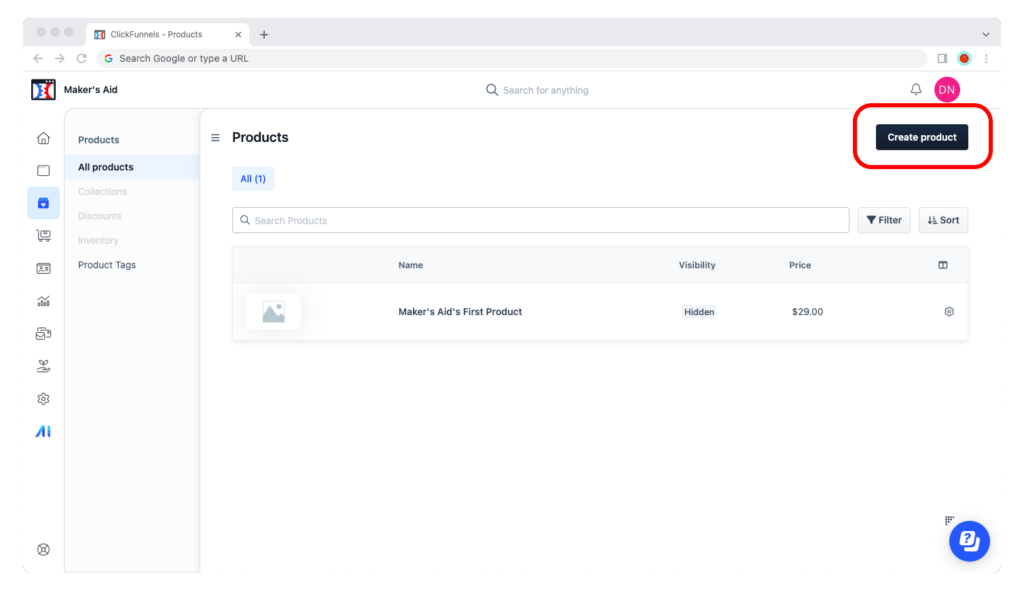
Step 2: Open your site’s workspace and switch to the “Products” tab.

Step 3: To create a new product, click on the black “Create product” button in the upper-right corner of the browser window.
Step 4: Select your product’s type. You can create a digital product, a physical product, or a bundle of digital, physical, or digital and physical products.

Step 5: Name your product.

Step 6: Optionally, add a description for your product. (Don’t worry, you can edit this later in the “Products” tab.)

Step 7: Now push the “Create product” button.

Step 8: Next, tell ClickFunnels 2.0 if this product is a one-time purchase (for example, a book, a course, a digital downloadable) or recurring subscription (say, a community or a membership program).

Step 9: Set your product’s price. Optionally, you can enter a “Compare amount.” If you’re selling your product at a discount, the compare amount is essentially the non-discounted price.

Step 10 (Optional): Enter a “Price name.” This is what’s shown to your customers at checkout. For example, “My Product Bundle: Christmas 2023 Special.”
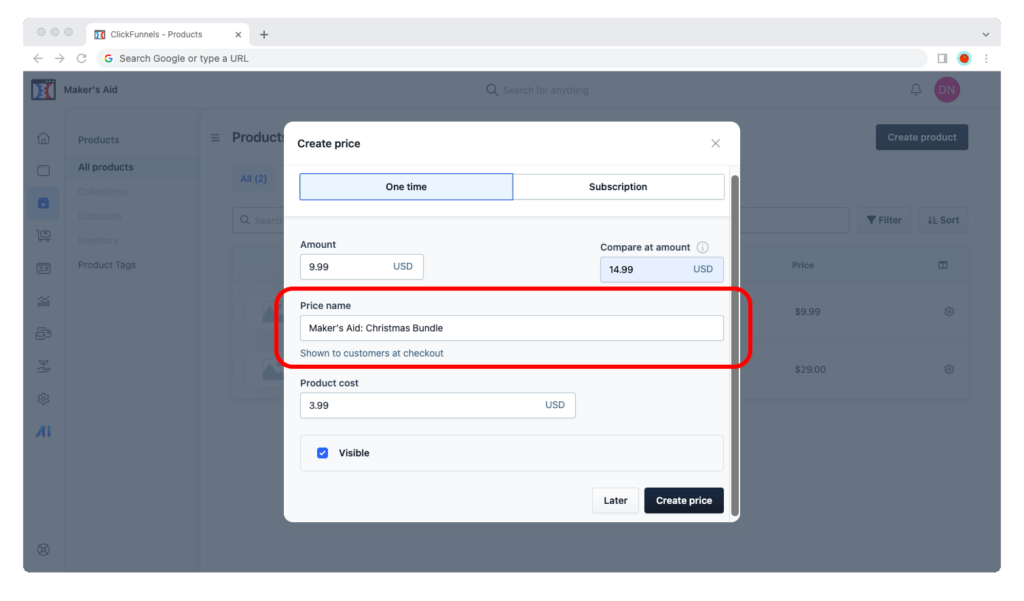
This field is optional, so if you’re not sure if you need it, you can skip it and create a product without it. (You can also add it in by editing the product later.)
Step 11 (Optional): Enter a “Product cost.” This is the per-unit cost of your product for analytics purposes. For example, you may be selling a product for $9.99 when your per-unit cost to produce that product is $3.99, leaving you with $6 of revenue per single product sale.

Step 12: Decide whether to make that price visible. In ClickFunnels 2.0, one product can have many prices. Making a price visible means customers will be able to see that price in the Store and Customer Center. By not making a price visible, you can still sell the product for that price in your funnels — but customers can’t buy it for that price anywhere else.

This field is optional, so if you’re not sure if you need it, you can skip it and create a product without it. (You can also add it in by editing the product later.)
Congratulations! You’ve just created your first product in ClickFunnels 2.0!
Thank you for reading this far, and I hope this tutorial helped. If you want to say thanks for have a question, be sure to leave a reply below!