There are two steps to integrating CookiePro and Google Tag Manager:
- First, you need to add the CookiePro cookie banner to your website so that it sets and updates the cookie consent state in the data layer;
- Second, you need to ingest the cookie consent state as a user-defined variable in Google Tag Manager and create custom event triggers based on its values.
This tutorial shows you exactly how to do this, with instructions and screenshots for each step.
Part 1: Add CookiePro to Your Website
To be able to integrate Google Tag Manager to CookiePro, you need to deploy the CookiePro code snippet on your website.
You can do this either by manually inserting the CookiePro code snippet into your website’s <head> section or by deploying CookiePro as a tag through Google Tag Manager.
Personally, I prefer to deploy CookiePro as a tag through Google Tag Manager because it leads to less code snippets implemented outside of my website’s tag management tool.
How to add CookiePro to your website through Google Tag Manager:
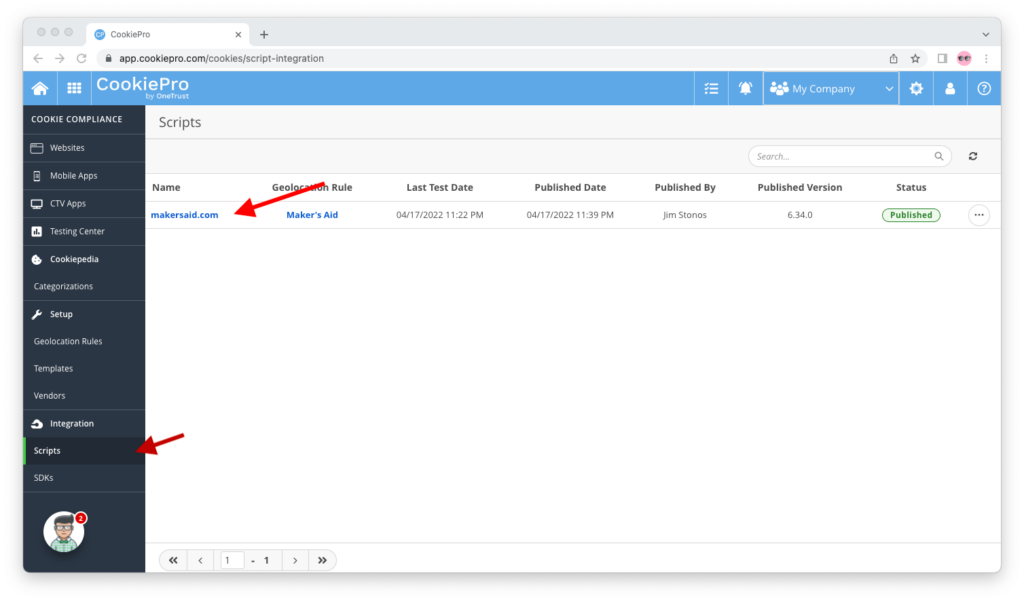
Step 1: Open CookiePro, click on “Scripts” under “Integration” in the lower part of the left sidebar, and click on the website for which you want to get the cookie banner code snippet.
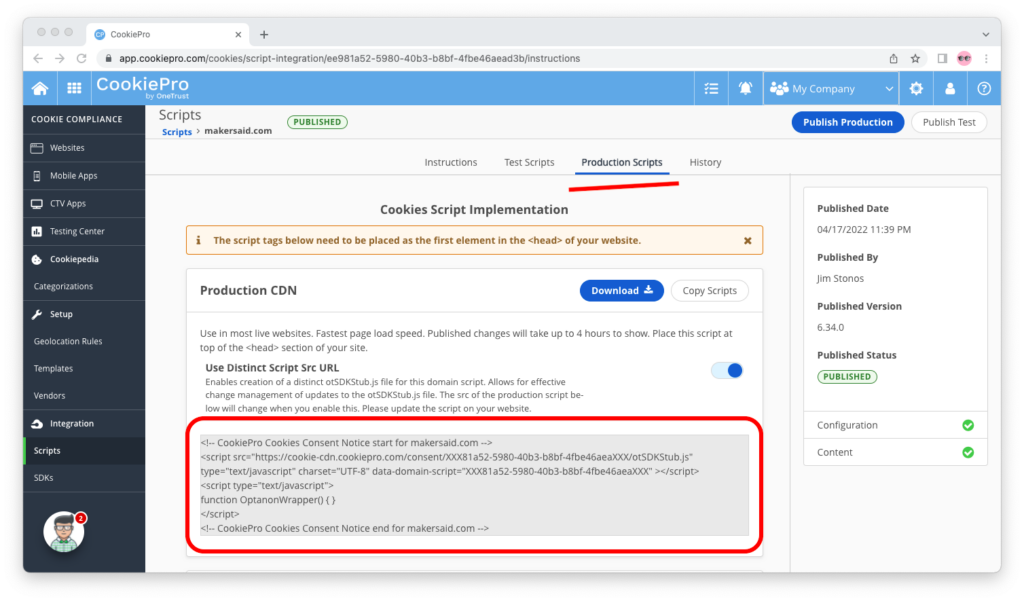
Step 2: Go to “Production Scripts,” make sure to toggle “Use Distinct Script Src URL” on, then copy the code snippet.
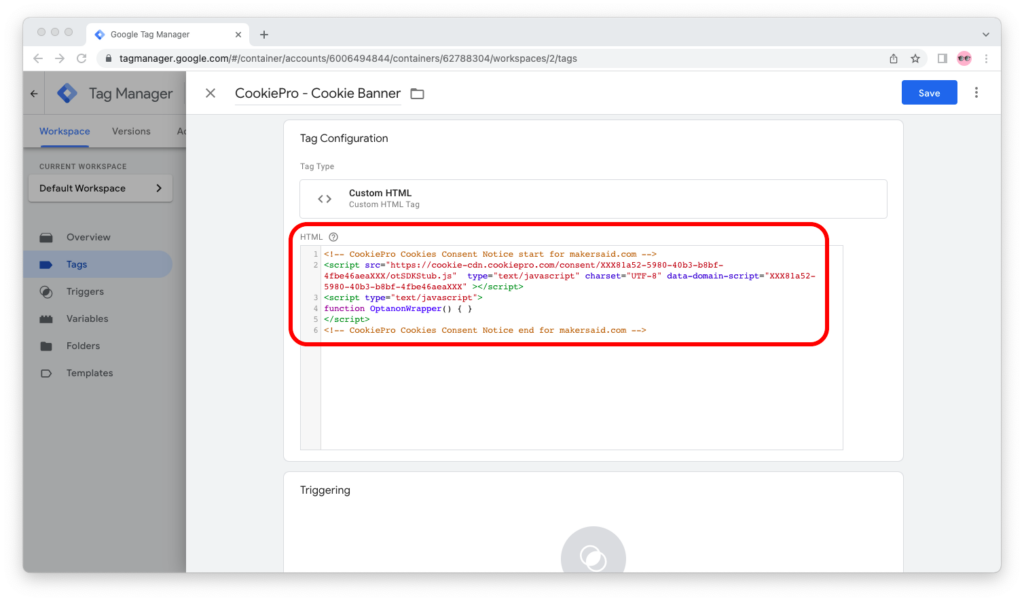
Step 3: Open Google Tag Manager. Add a new Custom HTML tag, paste the CookiePro code snippet and give the tag a descriptive name like “CookiePro – Cookie Banner.”
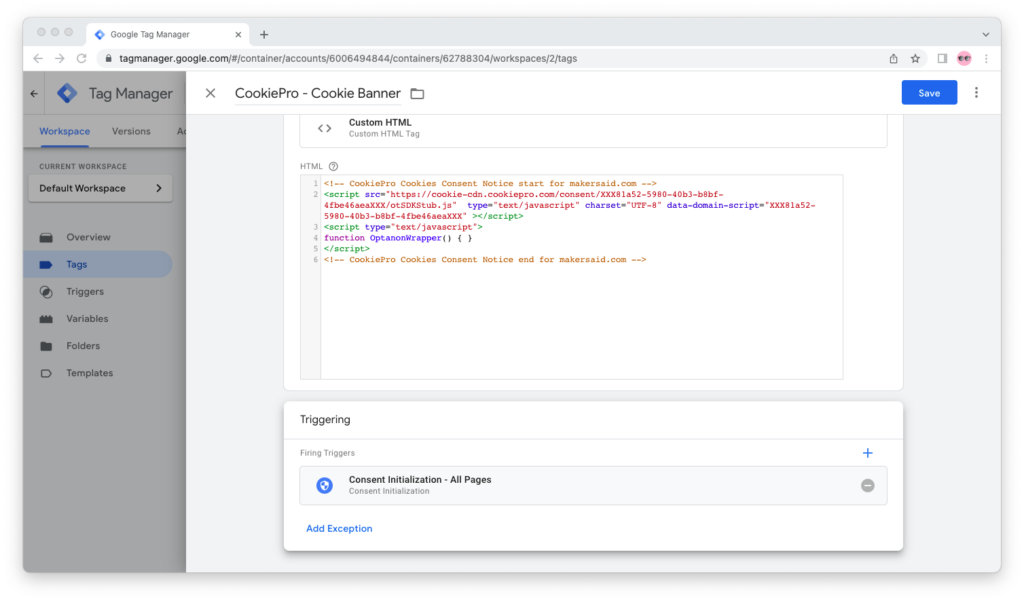
Step 4: Set the trigger to “Consent Initialization – All Pages” and click the blue “Save” button in the upper right corner.
Step 5: Make your CookiePro cookie banner live by publishing a new version of the Google Tag Manager container.
To do this, click on the blue “Submit” button in the upper right corner, give your container version a descriptive name, then hit “Publish.”
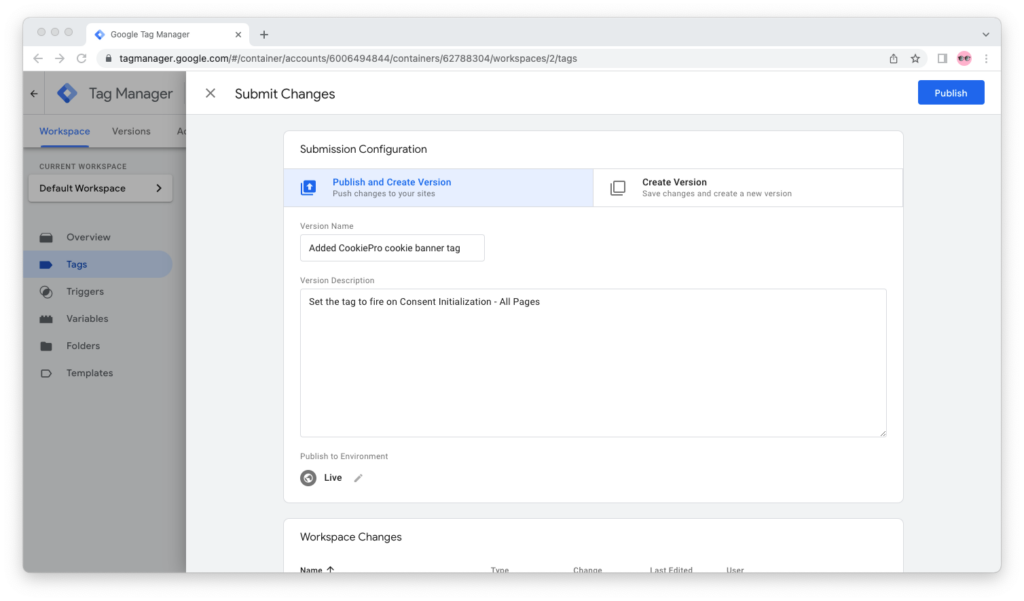
Why use the “Consent Initialization – All Pages” trigger?
You want to use the “Consent Initialization – All Pages” trigger because, as explained in Google Tag Manager’s documentation, it’s intended for tags that set or update the cookie consent state for your website.
This trigger ensures that the CookiePro tag is always fired before all other tags in the Google Tag Manager container for on your website. Any other tags that need to fire early on should use the “Initialization – All Pages” trigger.
This is important because the triggers for the rest of your tags, which you’re about to set up, will depend on the value of the custom event with the cookie consent state that CookiePro will push to the data layer.
Part 2: Configure Google Tag Manager
When the user views a page on your website or changes their cookie preferences from the cookie banner, CookiePro will set and update the cookie consent state by pushing events to the data layer.
Here’s what those events pushed to the data layer look like:

(To view the events pushed by CookiePro to your website’s data layer, visit your website, open your browser’s developer tools, go to the console, then type dataLayer and hit enter.)
The names and formats for these CookiePro events vary, but that doesn’t matter. You’re only interested in the value of the OnetrustActiveGroups key/value pair at the OneTrustGroupsUpdated event.
So you want to configure Google Tag Manager to ingest this value at every occurence of this data layer event.
Here’s how to do it.
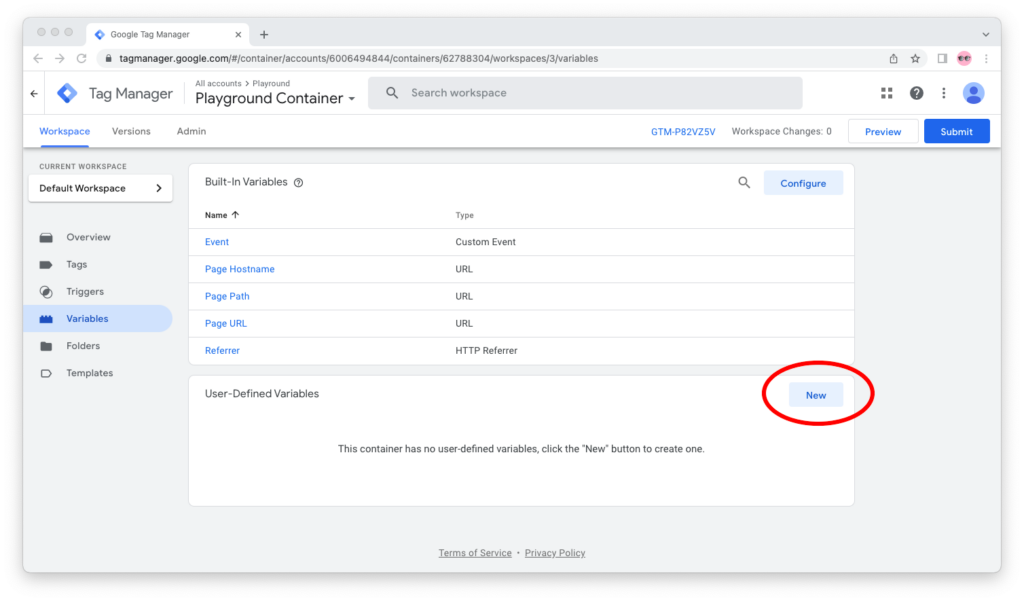
Part 2.1: Create a User-Defined Variable
Step 1: Open Google Tag Manager, then go to “Variables” and create a user-defined variable.
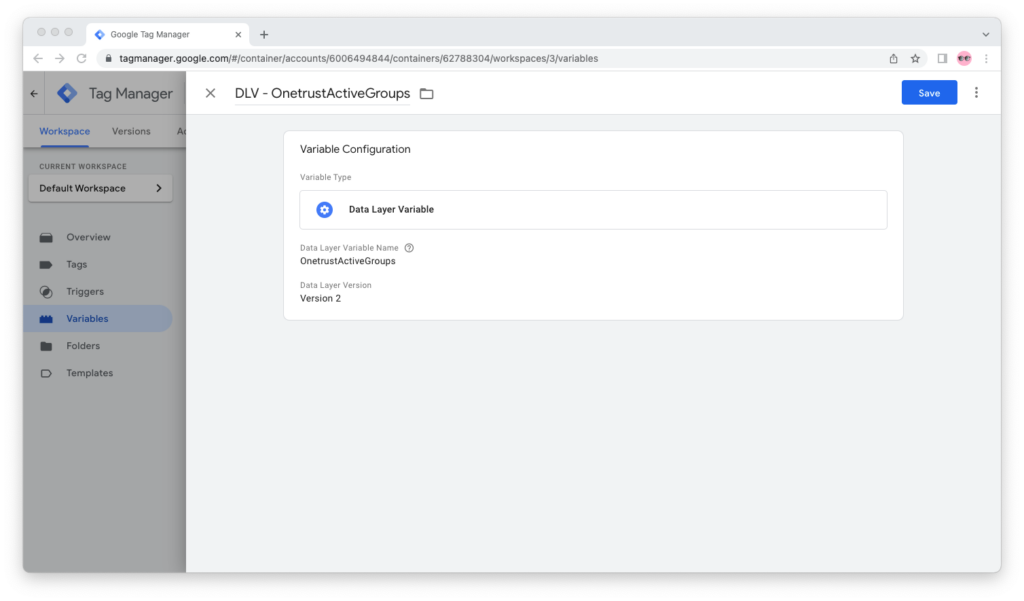
Step 2. Select “Data Layer Variable” for the variable type, enter OnetrustActiveGroups under “Data Layer Variable Name.”
Give your user-defined variable a descriptive name like “DLV – OnetrustActiveGroups” and click the blue “Save” button in the upper right corner.
When you’re done with this part, you should see the “DLV – OnetrustActiveGroups” variable in your list of user-defined variables in Google Tag Manager.
If this is indeed the case, continue to Part 2.2.
Part 2.2: Create Firing and Blocking Triggers
For each cookie group in CookiePro, you’ll need to create a trigger to fire tags and a trigger to block tags in Google Tag Manager based on the “DLV – OnetrustActiveGroups” user-defined variable’s value.
By default, your CookiePro cookie banner has these cookie groups with these values in the OnetrustActiveGroups data layer variable (and, subsequently, the “DLV – OnetrustActiveGroups” user-defined variable in Google Tag Manager”) when they are active:
| Cookie Group | Value in “DLV – OnetrustActiveGroups” |
|---|---|
| Strictly Necessary Cookies | ,C0001, |
| Analytics Cookies | ,C0002, |
| Personalization Cookies | ,C0003, |
| Targeting Cookies | ,C0004, |
| Social Media Cookies | ,C0005, |
(To check the cookie groups and IDs for your organization, open CookiePro, select “Categorizations” from the left sidebar, and go to “Categories” from the top bar.)
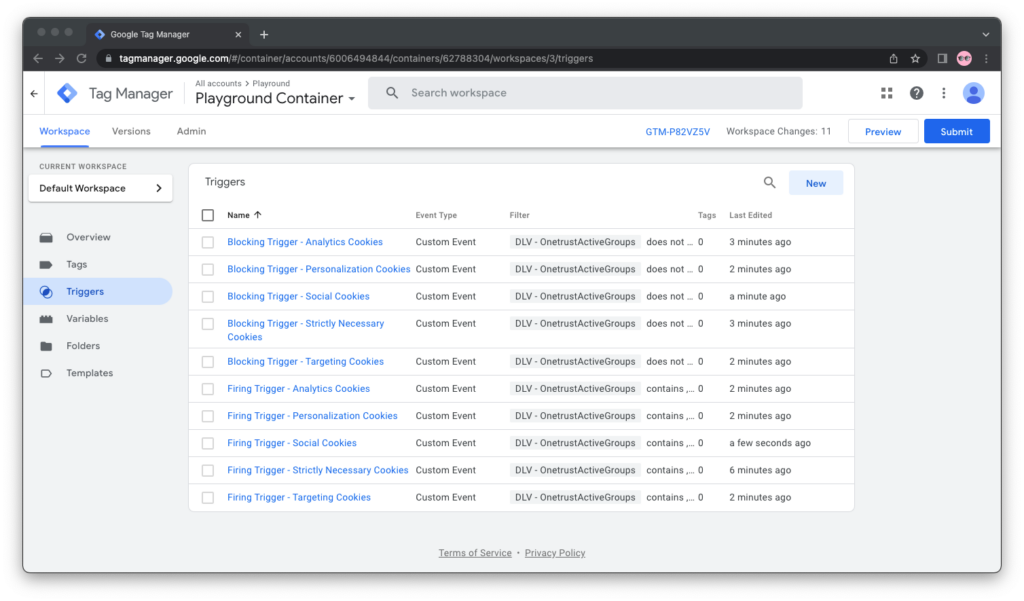
You’ll want to create one trigger to fire tags and one trigger to block tags for each cookie group. In other words, when you are done, you will have a total of 5 firing triggers and 5 blocking triggers that you can reuse across your tags:
| Cookie Group | Firing Trigger | Blocking Trigger |
|---|---|---|
| Strictly Necessary Cookies | DLV – OnetrustActiveGroups contains ,C0001, | DLV – OnetrustActiveGroups does not contain ,C0001, |
| Analytics Cookies | DLV – OnetrustActiveGroups contains ,C0002, | DLV – OnetrustActiveGroups does not contain ,C0002, |
| Personalization Cookies | DLV – OnetrustActiveGroups contains ,C0003, | DLV – OnetrustActiveGroups does not contain ,C0003, |
| Targeting Cookies | DLV – OnetrustActiveGroups contains ,C0004, | DLV – OnetrustActiveGroups does not contain ,C0004, |
| Social Media Cookies | DLV – OnetrustActiveGroups contains ,C0005, | DLV – OnetrustActiveGroups does not contain ,C0005, |
Now that you have these triggers mapped out for you, let’s look at how to create them in Google Tag Manager.
How to create a firing trigger for a CookiePro cookie group in Google Tag Manager:
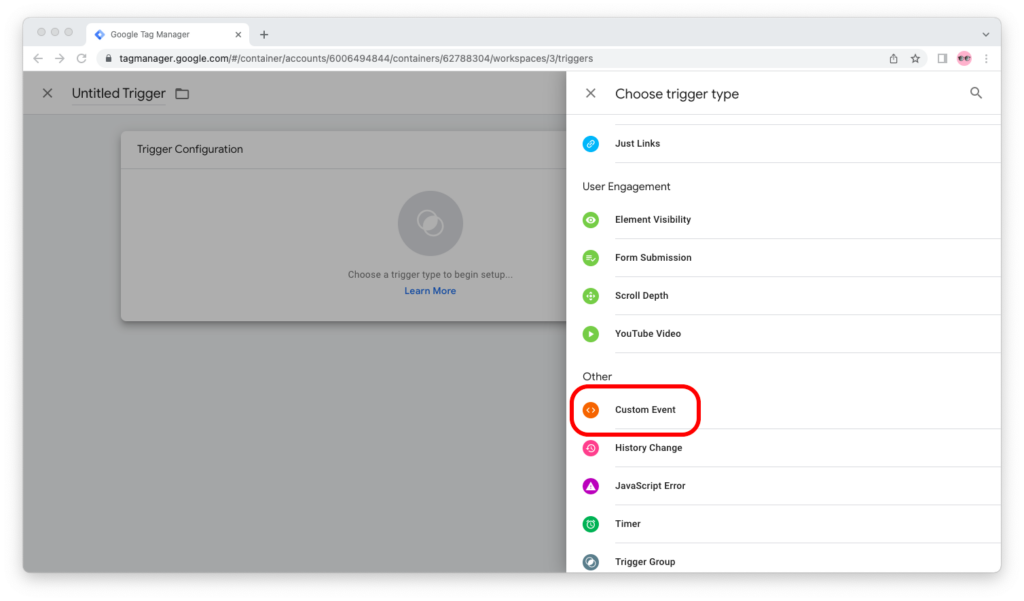
Step 1: Open your Google Tag Manager container. Go to “Triggers” and create a new trigger.
Next, Google Tag Manager will ask you to choose a trigger type. Click “Custom Event” under “Other.”
Step 2: Give your trigger a descriptive name like “Firing Trigger – Strictly Necessary Cookies.”
Enter OneTrustGroupsUpdated in “Event Name.” (Since you’re not using any RegEx rules, there’s no need to check “Use regex matching.”)
Under “This trigger fires on,” make sure to select “Some Custom Events.”
Under “Fire this trigger when an Event occurs and all of these conditions are true,” set the following rule:
DLV - OnetrustActiveGroups contains ,C0001,
Hit the blue “Save” button in the upper right corner.
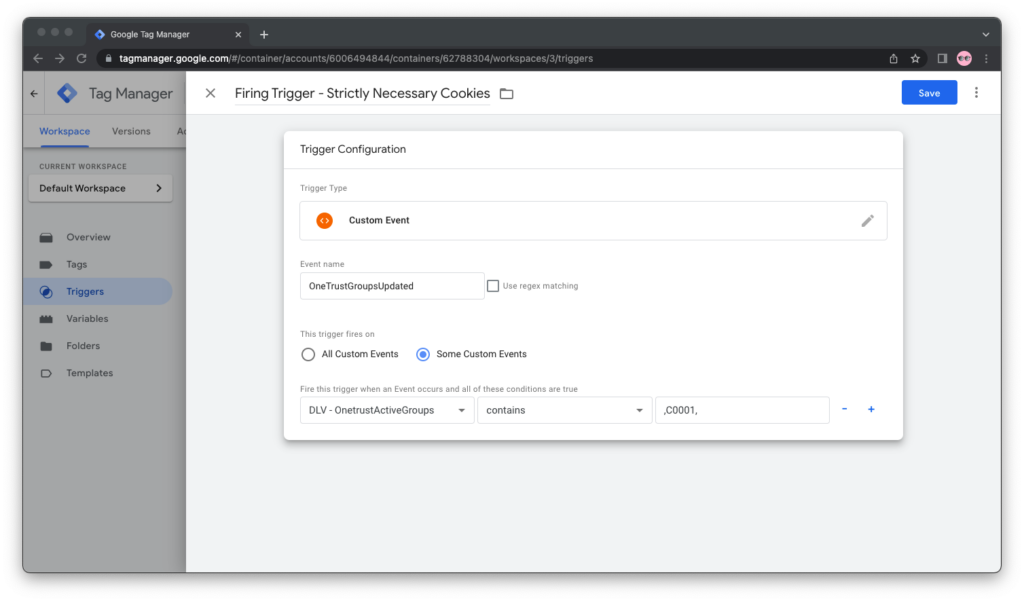
(As we already touched on, you will need to repeat this step and create separate firing triggers for each cookie category, adjusting the rule to the cookie category ID accordingly.)
How to create a blocking trigger for a CookiePro cookie group in Google Tag Manager:
Step 1: Open your Google Tag Manager container. Go to “Triggers” and create a new trigger.
Next, Google Tag Manager will ask you to choose a trigger type. Click “Custom Event” under “Other.”

Step 2: Give your trigger a descriptive name like “Blocking Trigger – Strictly Necessary Cookies.”
Enter OneTrustGroupsUpdated in “Event Name.” (Since you’re not using any RegEx rules, there’s no need to check “Use regex matching.”)
Under “This trigger fires on,” make sure to select “Some Custom Events.”
Under “Fire this trigger when an Event occurs and all of these conditions are true,” set the following rule:
DLV - OnetrustActiveGroups does not contain ,C0001,
Hit the blue “Save” button in the upper right corner.
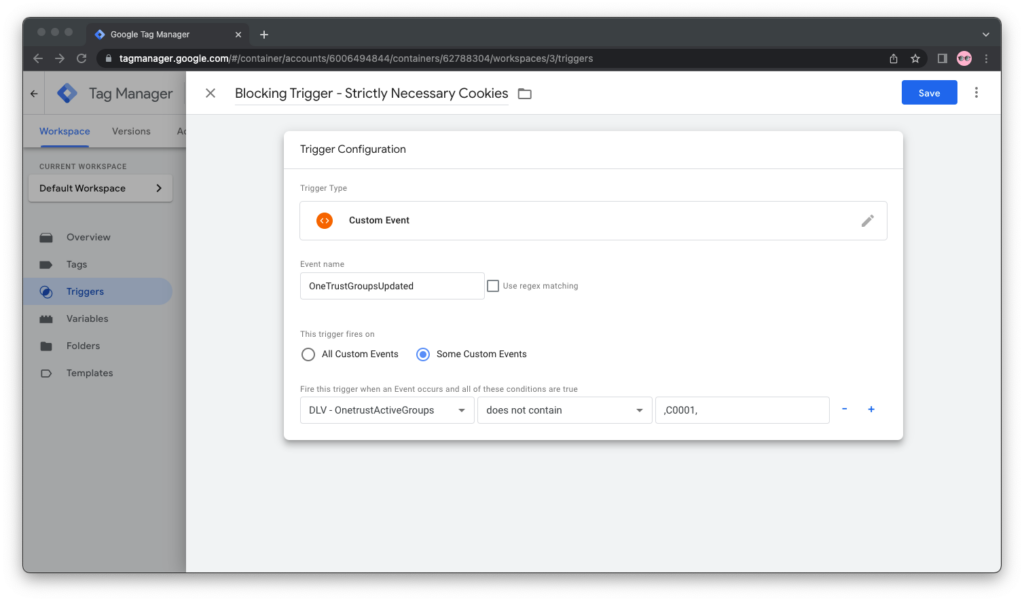
(As we already touched on, you will need to repeat this step and create separate blocking triggers for each cookie category, adjusting the rule to the cookie category ID accordingly.)
Repeat for all cookie categories:
Remember, you need one firing trigger and one blocking trigger for each cookie category. You know you’re done with creating triggers when your user-defined trigger list looks like this:
Part 2.3: Apply the Firing and Blocking Triggers to Your Tags
Last but not least, you need to assign firing triggers and/or blocking triggers to your tags.
The firing trigger will fire a tag when there is consent for its given cookie group and the blocking trigger will block a tag from firing when there isn’t consent for its given cookie group.
As a golden rule, apply the firing triggers only to tags that need to fire at page view. In contrast, the blocking triggers should be applied to all tags that relate to a given cookie group.
So, of the triggers that you just set up, your page view tags will have firing and blocking triggers, whereas all of other tags will only have blocking triggers.
When to apply firing and blocking triggers:
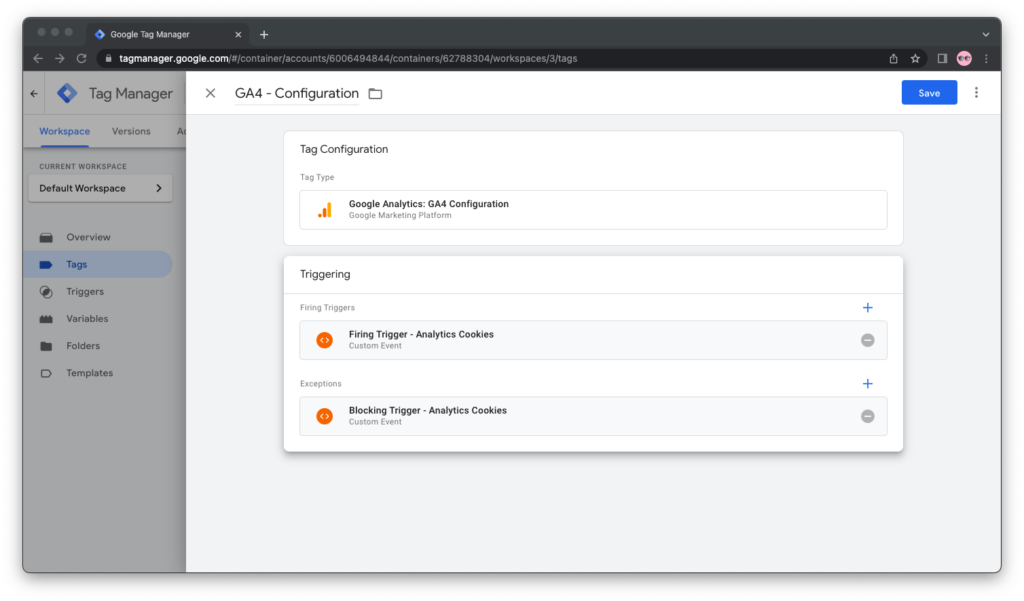
For example, you want your Google Analytics 4 configuration tag to fire at page view, so you’re going to give it a firing trigger for analytics cookies.
But you also don’t want to deploy Google Analytics when the user hasn’t given (or revokes) their consent for analytics cookies, so you also want to apply the blocking trigger for the analytics cookie group as an exception:
When to apply blocking triggers only:
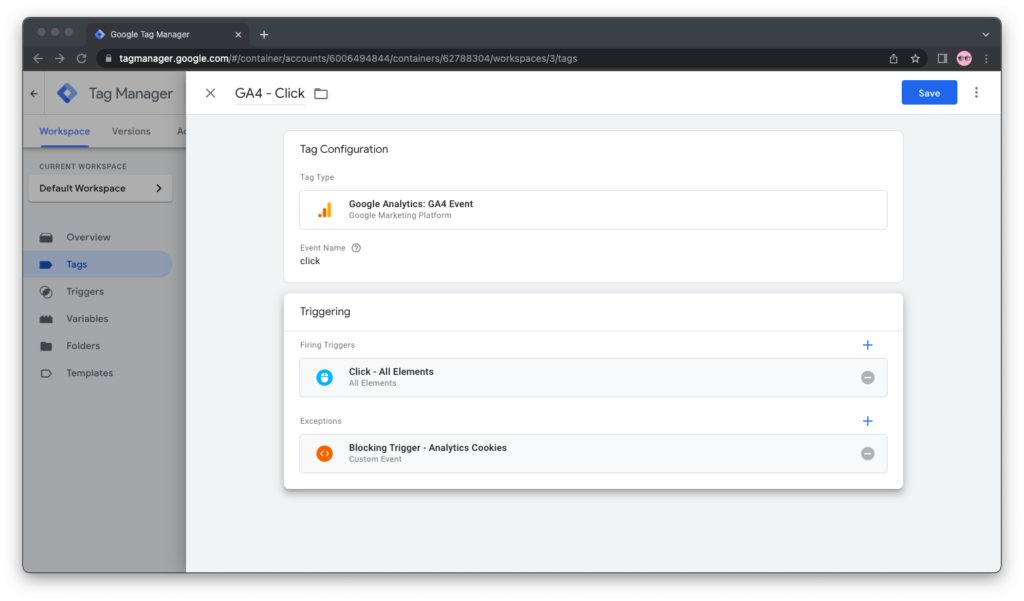
Suppose you’re sending a custom event to Google Analytics whenever the user clicks a button.
You already have a trigger for that custom event’s tag. And you don’t want to assign it a firing trigger for a cookie group because your custom event will misfire at every page view.
However, you do want to give it a blocking trigger because you don’t want to fire a tag for a custom Google Analytics 4 event when the user hasn’t consented to analytics cookies:
Part 3. Testing Your Setup
Time to test your setup. This checklist will help:
- Tag sequencing:
- Are you firing CookiePro before all other tags, either by placing it above them in your HTML markup or by using the Google Tag Manager “Consent Initialization – All Pages” trigger?
- Variable configuration:
- Have you created a “DLV – OnetrustActiveGroups” variable?
- Is the variable name correctly configured to
OnetrustActiveGroups?
- Trigger configuration:
- Have you created firing triggers and blocking triggers for each cookie group?
- Are you referencing the correct user-defined variable (“DLV – OnetrustActiveGroups”) in your trigger configuration?
- Do the firing and blocking trigger for each cookie group have the correct ID for that group? (As a reminder, the default IDs in CookiePro are
C0001,C0002,C0003,C0004, andC0005.)
- Tag configuration:
- Do tags that need to fire on page view have both the firing trigger and the blocking trigger for their given cookie group?
- Do tags that don’t need to fire on page view have the blocking trigger for their given cookie group?
- Do all tags have triggers for the correct cookie group?
- Troubleshooting:
- Does CookiePro’s
OneTrustGroupsUpdatedevent contain the correct values based on the cookie banner’s settings and/or the user’s choices? - Does Google Tag Manager fire tags for a given cookie group only when that cookie group is active?
- Does CookiePro’s
Though much can be said and written about testing the integration between CookiePro and Google Tag Manager, the checklist above should help you identify and resolve the most common problems.


Thanks for this guide. One note: When adding the CookiePro script to Google Tag Manager, you need to check the “Support document.write” box – otherwise, the banner will not appear on the website.