When the user clicks on a link in your HTML document, you want to retrieve the target URL, meaning the value of the href attribute, with JavaScript.
What is the best way to accomplish this?
To get the value of the href attribute of a clicked link, create an event listener using AddEventListener() and retrieve the value of the href attribute using Element.target().
This tutorial will show you exactly how to do this in two steps.
First, you will learn how to create an event listener for all links or for specific links. Second, you will learn how to retrieve the value of the href attribute of a link when the user clicks it.
Creating an Event Listener
The EventTarget.AddEventListener() method of the EventTarget() Web API in JavaScript lets you create event listeners for when the user clicks on a DOM element in your HTML document.
This method lets you declare a function that gets called every time the event is fired. From the event, you can read the properties of the DOM element that it was attached to, allowing you to parse the value of the href attribute and store it in a variable.
The syntax for the AddEventListener() method is as follows:
// Event listener syntax
EventTarget.AddEventListener(type, listener);
Both the type and the listener arguments are mandatory.
Type is a string that specifies the event type that you want the event listener to listen for.
Listener can be an object within the scope of the EventListener Web API, or a function that gets called every time the event is fired.
In this case, we need to create an event listener for clicks on link elements, meaning <a> elements.
One of the best ways to do this is to use the Document.querySelectorAll() method. This method lets you create a loop that targets all instances of specific DOM elements using CSS selectors.
So you can do a simple selection for all links on your HTML page—or a narrowed-down selection of links with a specific id, class, or other.
Here’s how an event listener for all link clicks looks like:
// Create event listener for all link clicks
document.querySelectorAll('a').forEach(link => {
  link.addEventListener('click', (e) => {
    console.log('A link was clicked');
  });
});
If you need to narrow down your event listener’s scope to clicks on specific links, for example links with a given id or className, all you need to do is modify your CSS selector:
// Event listener only for <a class="nav-item">
document.querySelectorAll('a.nav-item').forEach(link => {
  link.addEventListener('click', (e) => {
    console.log('A link was clicked');
  });
});

// Event listener only for <a id="nav-item-01">
document.querySelectorAll('a#nav-item-01').forEach(link => {
  link.addEventListener('click', (e) => {
    console.log('A link was clicked');
  });
});
Depending on your implementation requirements, a CSS selector can be as simple as targeting <a> elements or as complex as targeting an n-th <a> element within a parent element or a group of elements.
Mastering CSS selectors can take your query selection skills to the next level. If you’re a frontend developer, this skill will give you an upper hand in your daily work.
Related: Event Listeners for Multiple Elements in JavaScript
Retrieving the Href Attribute
Now that you know how to create event listeners that listen to clicks on links, whether all links or specific links, let’s look at how to retrieve the value of the href attribute from them.
This can be done by passing on the e parameter to the function,short for “event,” that gets called on click.
Then, you can use the Event.target() Web API to retrieve the className attribute of the DOM object to which the event in your event listener was attached:
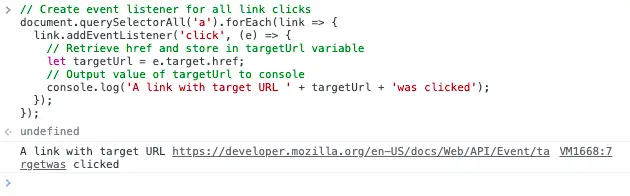
// Create event listener for all link clicks
document.querySelectorAll('a').forEach(link => {
  link.addEventListener('click', (e) => {
    // Retrieve href and store in targetUrl variable
    let targetUrl = e.target.href;
    // Output value of targetUrl to console
    console.log('A link with target URL ' + targetUrl + 'was clicked');
  });
});
If you opened up your browser’s console right now, copy/pasted and ran this code, then clicked on a link or two, you’d observe the following results:
In Conclusion
I hope you found this tutorial useful.
I recently had to tackle this challenge myself as I implemented a data layer for analytics purposes on one of my websites. It took me a few tries (and a couple of hours) to get to the best solution, and I believe this is it.
If you have any questions, or you want to share other ways to achieve this with the rest of this post’s readers, be sure to leave a reply below.
Greetings.
Just what I needed after several hours of trying with a multilevel menu. Excellent tutorial. Thank you very much, very grateful.